How to Configure Mail Flow Rules in Exchange Online: Step-by-Step Guide for IT Administrators
Strict control over email flow is a fundamental pillar in the administration of any modern business environment. Daily, organizations face challenges related to information security, regulatory compliance, and management of content circulating through emails. From preventing sensitive data leakage to protecting against external threats such as phishing and malware, the ability to manage messages in transit is more critical than ever. In the Microsoft 365 ecosystem, one of the most powerful tools to address these challenges is Mail Flow Rules (also known as Transport Rules) in Exchange Online.
This article is designed as a practical and detailed guide for IT administrators. Our goal is to demystify Mail Flow Rules, demonstrating their potential through practical scenarios and providing a step-by-step guide for their creation and management. By the end of this reading, you will be able to implement email flow rules that not only reinforce your organization's security and compliance but also automate processes and optimize daily Exchange Online management.
What are Mail Flow Rules?
Mail Flow Rules are a set of conditions, exceptions, and actions that can be applied to emails in transit in your Exchange Online organization. Think of them as an intelligent gatekeeper that inspects each message entering or leaving, making decisions based on rules you predefine. The main difference compared to inbox rules that users can configure in Outlook is the timing and scope of their action: while inbox rules process emails after delivery to the mailbox, Mail Flow Rules act during message transport, before it reaches its final destination.
🔑 Key Difference: Mail Flow Rules operate at the organization level during message transport, while inbox rules work at the individual user level after delivery. This allows IT administrators to enforce security and compliance policies consistently across all users, regardless of their personal settings.
Mail Flow Rules offer IT administrators powerful capabilities to strengthen security by blocking threats before they reach mailboxes, ensure compliance through the application of legal disclaimers or prevention of sensitive information leakage, automate processes by redirecting emails for approval or to specific teams, and improve management by adding identifiers to external emails to alert users.
Components of Mail Flow Rules
To build an effective Mail Flow Rule, it is essential to understand its four main components. Each plays a specific role in the rule's logic, and their combination allows creating highly customized automation and security scenarios.
| Component | Description | Usage Example |
|---|---|---|
| Conditions | Identify the messages to which the rule should apply. If conditions are met, the rule proceeds to evaluate exceptions and actions. | "The sender is located outside the organization" or "The subject contains the word 'Confidential'". |
| Exceptions | Define cases where the rule should not be applied, even if conditions are met. They function as a condition override. | "Except if the recipient is a member of the 'Board' group". |
| Actions | Specify what should be done with a message that meets the conditions and doesn't match any exception. | "Add a warning at the beginning of the message" or "Redirect the message for approval". |
| Properties | Additional settings that control the rule's behavior, such as its priority, test mode, and activation period. | Set the rule to be tested without real impact or schedule its activation for a future date. |
💡 Pro Tip: The intelligent combination of these four components is what gives power and flexibility to Mail Flow Rules, allowing administrators to build complex logic that responds to specific organizational needs.
Common Practical Scenarios
To illustrate the power of Mail Flow Rules, let's explore three practical scenarios that are frequently implemented by IT administrators to strengthen security and communication.
Scenario 1: Add External Email Warning
Users frequently receive phishing emails that impersonate internal communications. The solution is to create a Mail Flow Rule that applies a visual warning at the top of each email coming from outside the organization, increasing user awareness and reducing phishing risks.
Scenario 2: Block Dangerous Attachments
Many organizations need to prohibit receiving specific file types commonly used to distribute malware, such as .exe, .bat, or .scr files. Implementing a rule that detects and blocks these attachments significantly reduces the organization's attack surface.
Scenario 3: Apply Legal Disclaimer
For legal compliance reasons, many companies need to add a confidentiality disclaimer to all emails sent to external recipients. Configuring a Mail Flow Rule that automatically attaches a standardized disclaimer ensures compliance consistently and automatically.
Step-by-Step Guide: Creating a Mail Flow Rule
Now that we understand the concepts and scenarios, let's move to the practical process of creating a Mail Flow Rule. We will focus on the scenario of adding an external email warning, one of the most useful and recommended.
📋 Prerequisites
Before starting, ensure you have:
- Permissions: Exchange Administrator or Global Administrator role in Microsoft 365
- Access: Exchange Admin Center (EAC) at https://admin.exchange.microsoft.com
- Time: Approximately 5-10 minutes to configure and test
Method 1: Via Exchange Admin Center (EAC)
The EAC offers an intuitive graphical interface for creating rules. Follow these detailed steps:
Step 1: Access the Exchange Admin Center and Navigate to Rules
Sign in to the Exchange Admin Center at https://admin.exchange.microsoft.com. In the left navigation menu, expand Mail flow and click on Rules. You will see the Rules management page where you can view, create, edit, and manage all your transport rules.
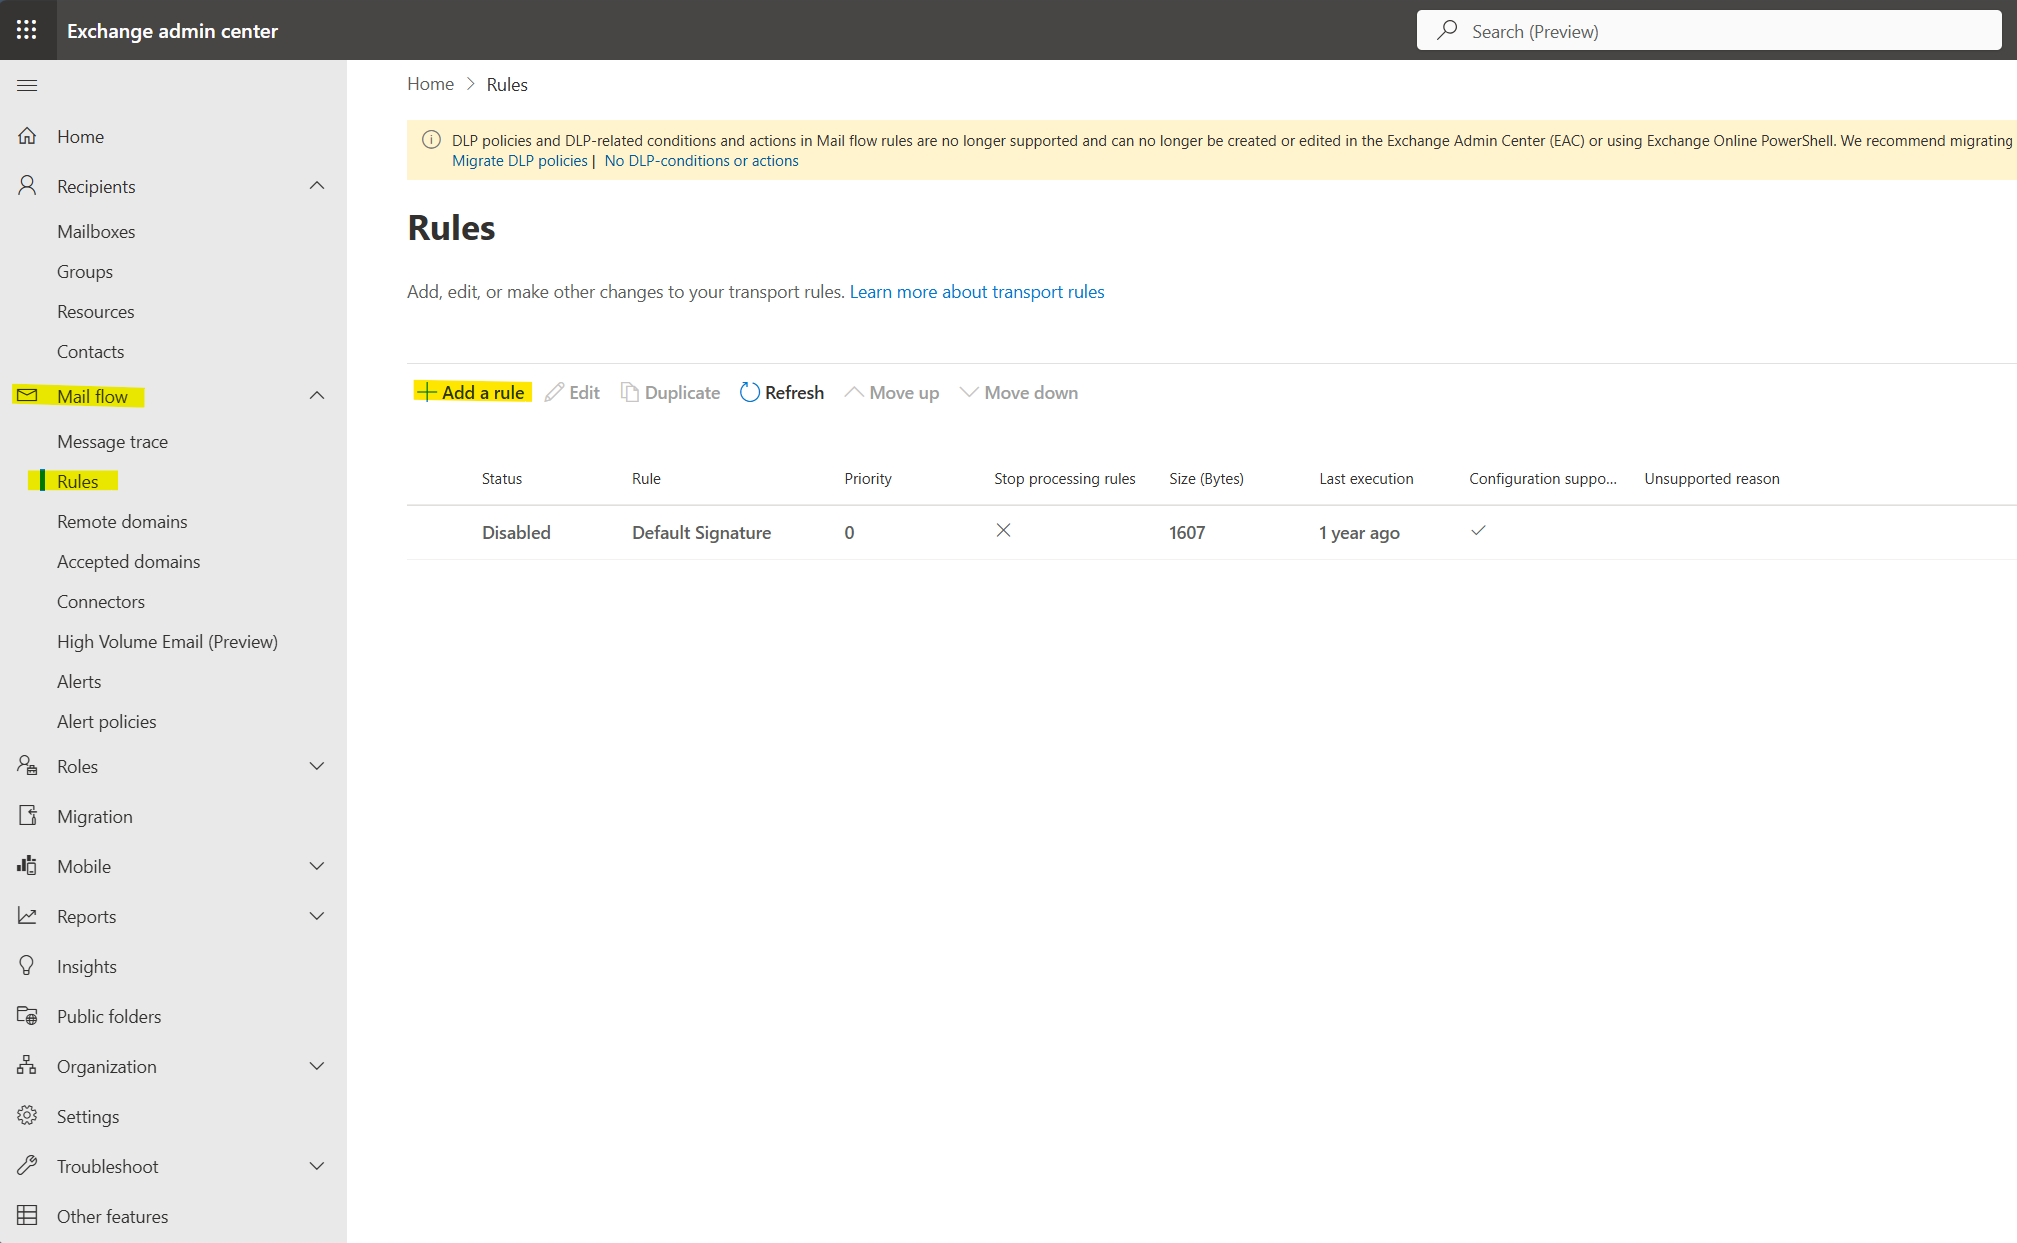
Figure 1: Exchange Admin Center showing the Mail flow Rules page
Step 2: Create a New Transport Rule
Click the + Add a rule button at the top of the Rules list. A wizard will open to guide you through the rule creation process. The wizard has three main steps: Set rule conditions, Set rule settings, and Review and finish.
Step 3: Define the Rule Name and Conditions
On the Set rule conditions page, start by giving your rule a descriptive name in the Name field. For this example, use "External Email Warning". Under Apply this rule if, you need to configure the condition that identifies external emails:
- Click the first dropdown and select The sender
- Click the second dropdown and select is external/internal
- A panel will open on the right side. Select Outside the organization
- Click Save to confirm the selection
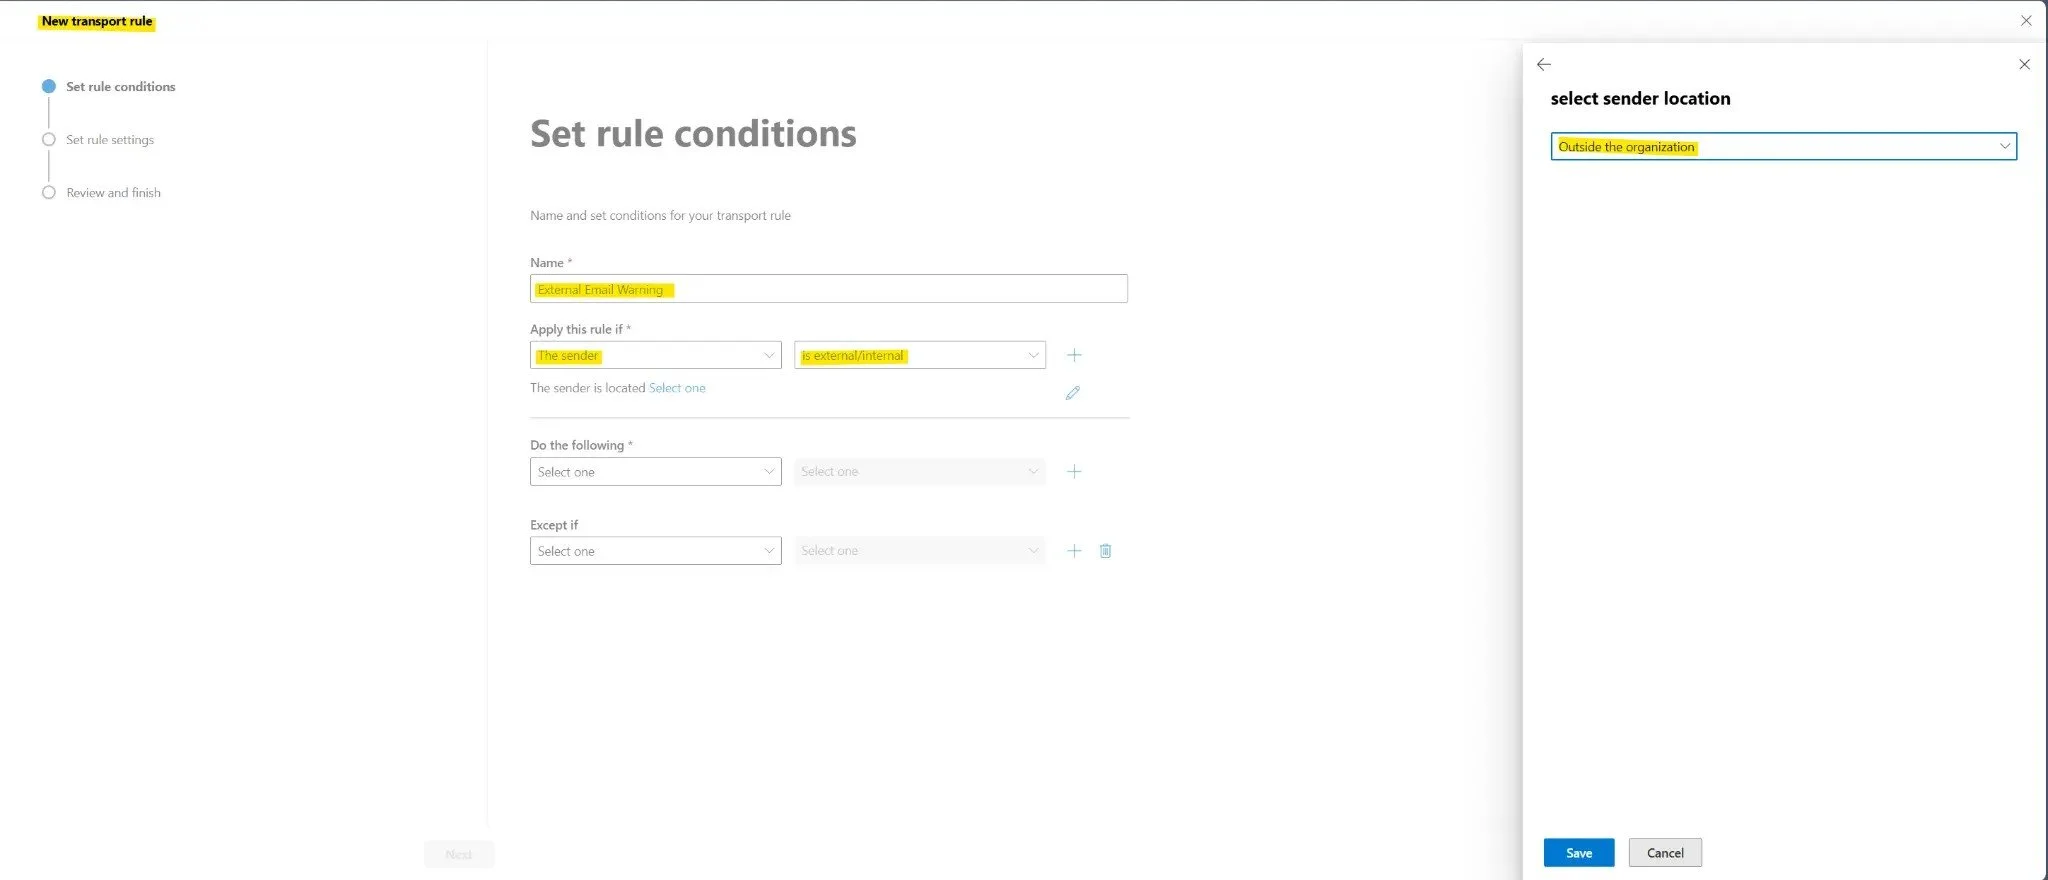
Figure 2: Configuring the sender location condition to "Outside the organization"
Step 4: Configure the Disclaimer Action
Now you need to define what action the rule will take. Under Do the following, configure the disclaimer:
- Click the first dropdown and select Apply a disclaimer to the message
- Click the second dropdown and select prepend a disclaimer
- Click on Enter text - a panel will open on the right side
- In the text box, paste the following HTML code for the warning banner:
<p><div style="background-color:#FFEB9C; padding:10px; border:1px solid #FFC82B; font-size:10pt; font-family: 'Calibri','Arial','sans-serif';"><strong>[WARNING]</strong> This message was sent from outside the organization. Do not click links or open attachments unless you recognize the sender and know the content is safe.</div></p>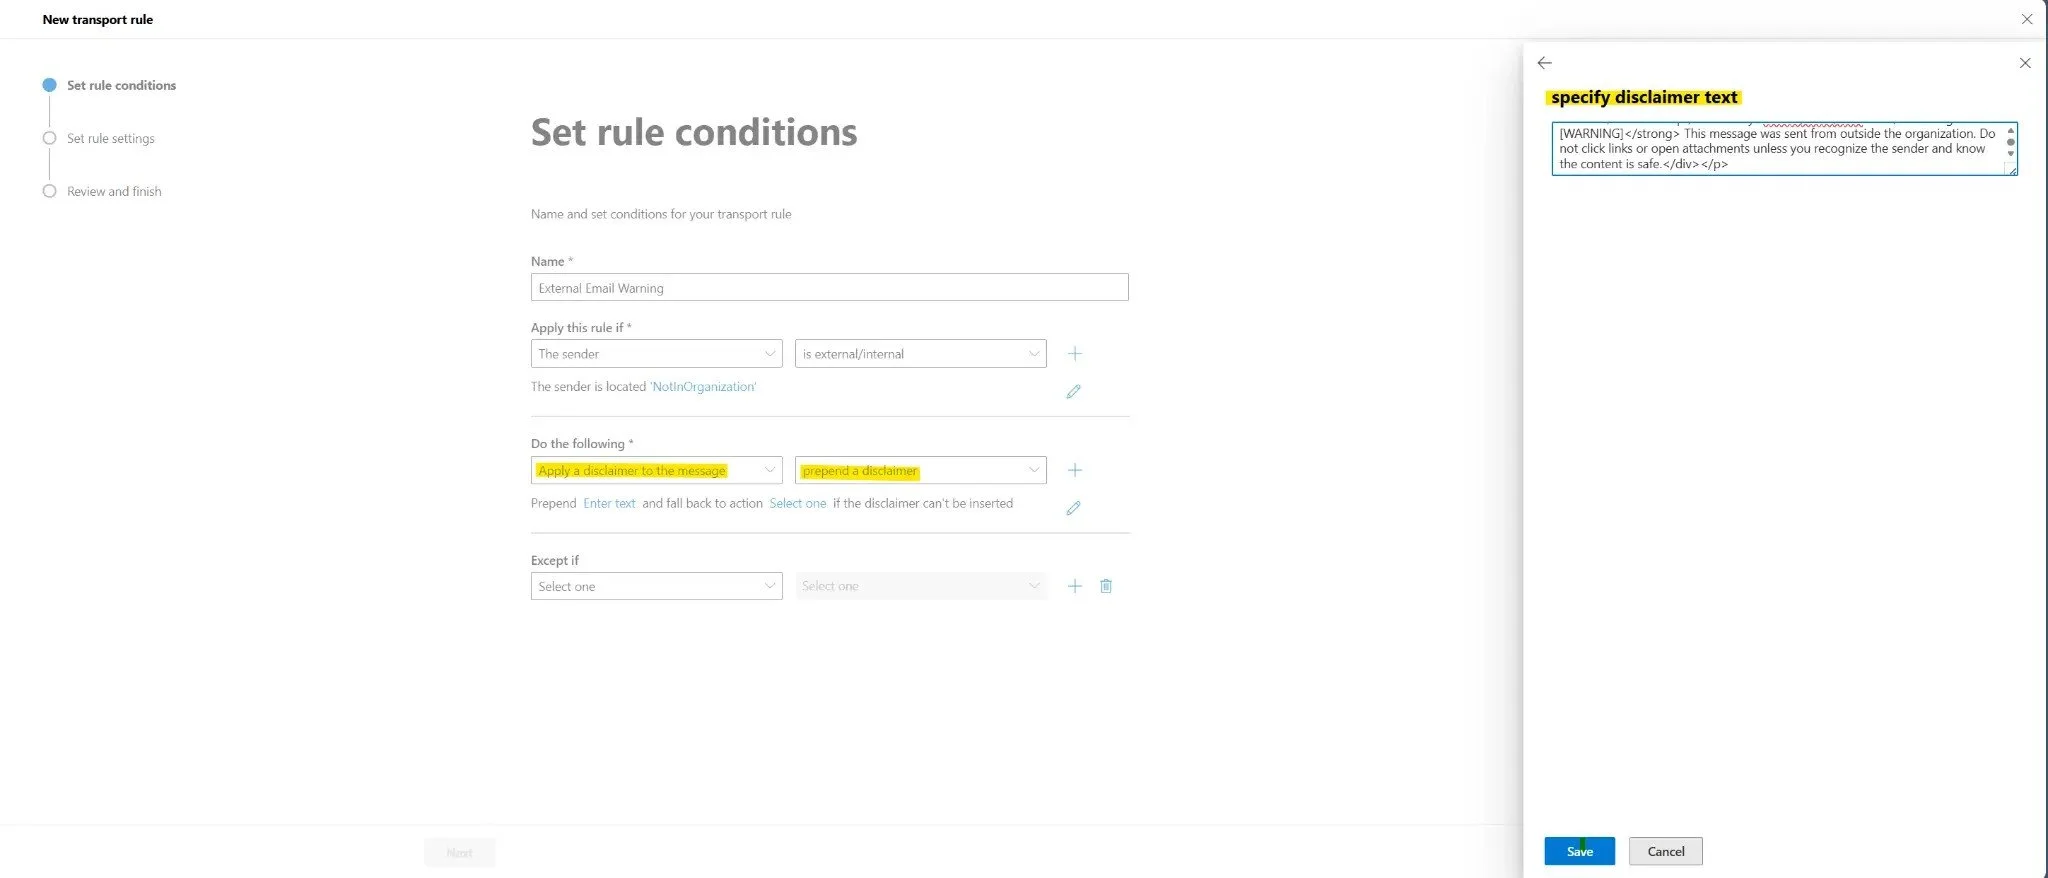
Figure 3: Entering the HTML disclaimer text that will be prepended to external emails
Step 5: Set the Fallback Action
After entering the disclaimer text, you need to specify what happens if the disclaimer cannot be inserted (for example, if the message format doesn't support it). The system will prompt you to select a fallback action. Choose Wrap from the dropdown. This option wraps the original message as an attachment and creates a new message with the disclaimer.
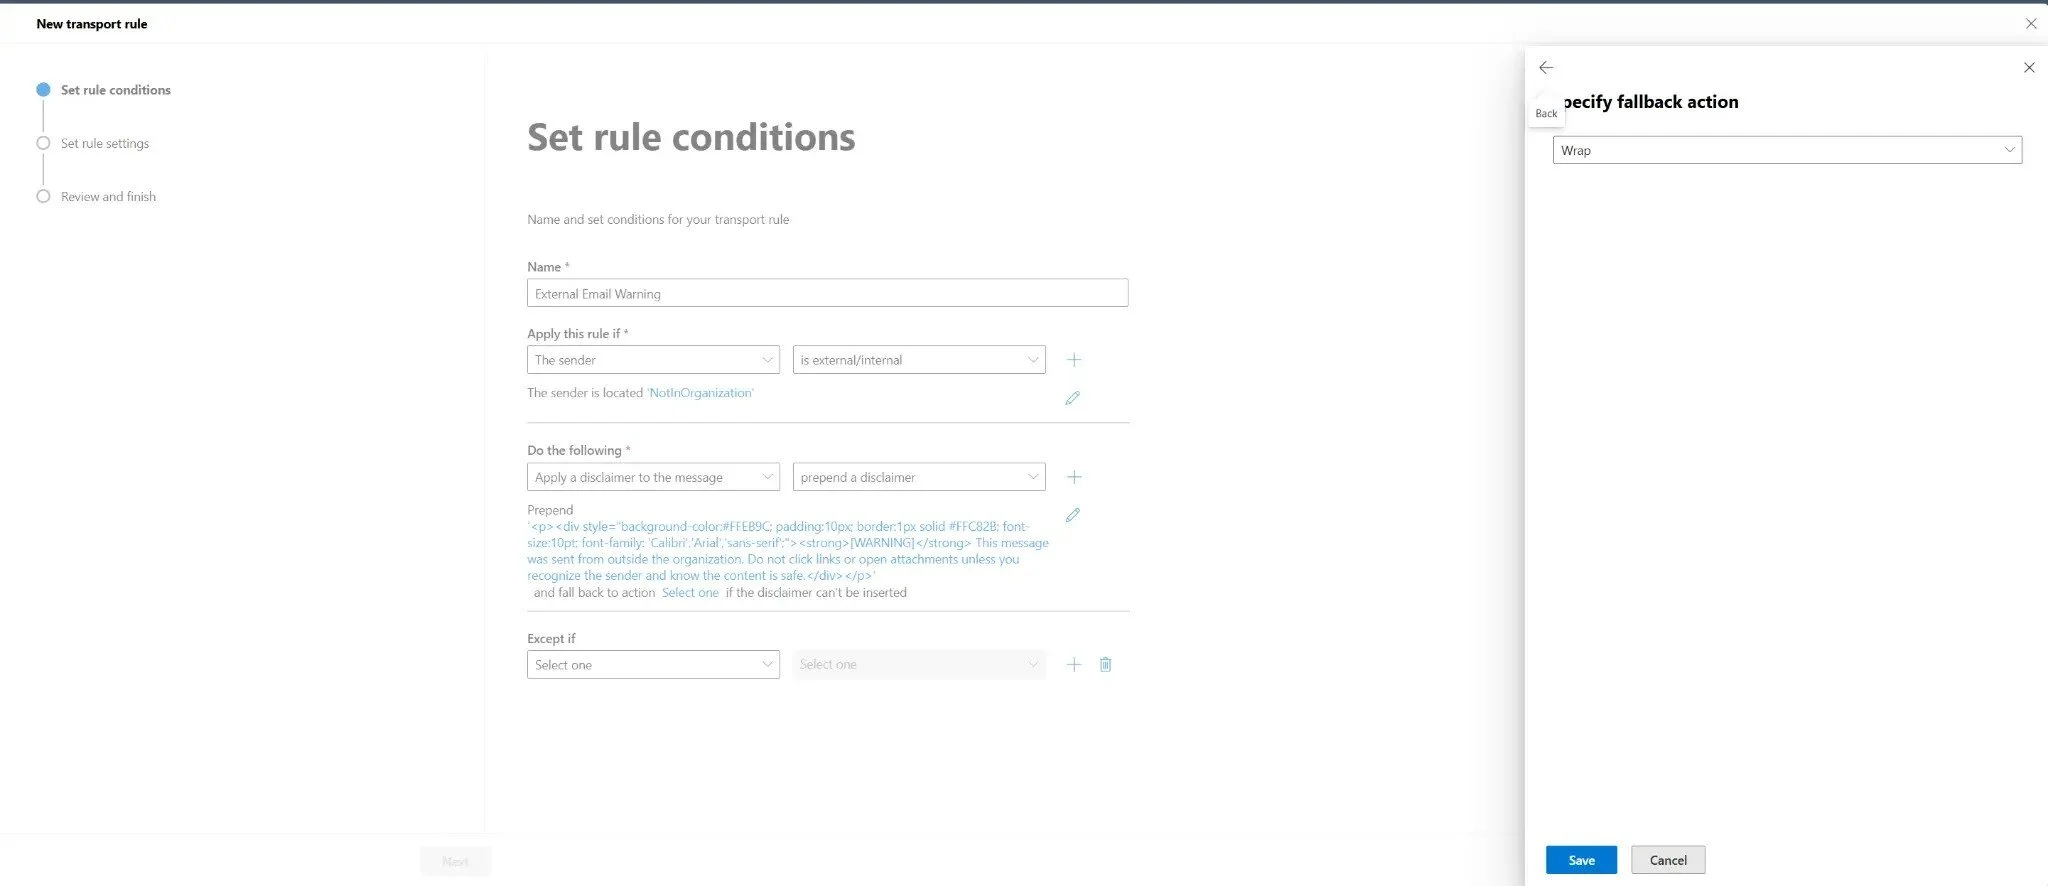
Figure 4: Setting the fallback action to "Wrap" for cases where the disclaimer cannot be inserted
Once configured, click Next to proceed to the rule settings.
Step 6: Configure Rule Settings
On the Set rule settings page, you'll configure how and when the rule operates:
- Rule mode: For initial deployment, select Test without Policy Tips. This allows you to monitor the rule's behavior without affecting users. Once you've verified it works correctly, you can edit the rule and change it to Enforce.
- Severity: Leave as Not specified unless you need to categorize the rule for reporting purposes.
- Activate this rule on: You can schedule when the rule becomes active. For immediate activation, check this box and set today's date, or leave it unchecked.
- Comments: Add documentation about the rule's purpose, such as "Adds security warning to all external emails to prevent phishing attacks. Implemented Nov 2025."
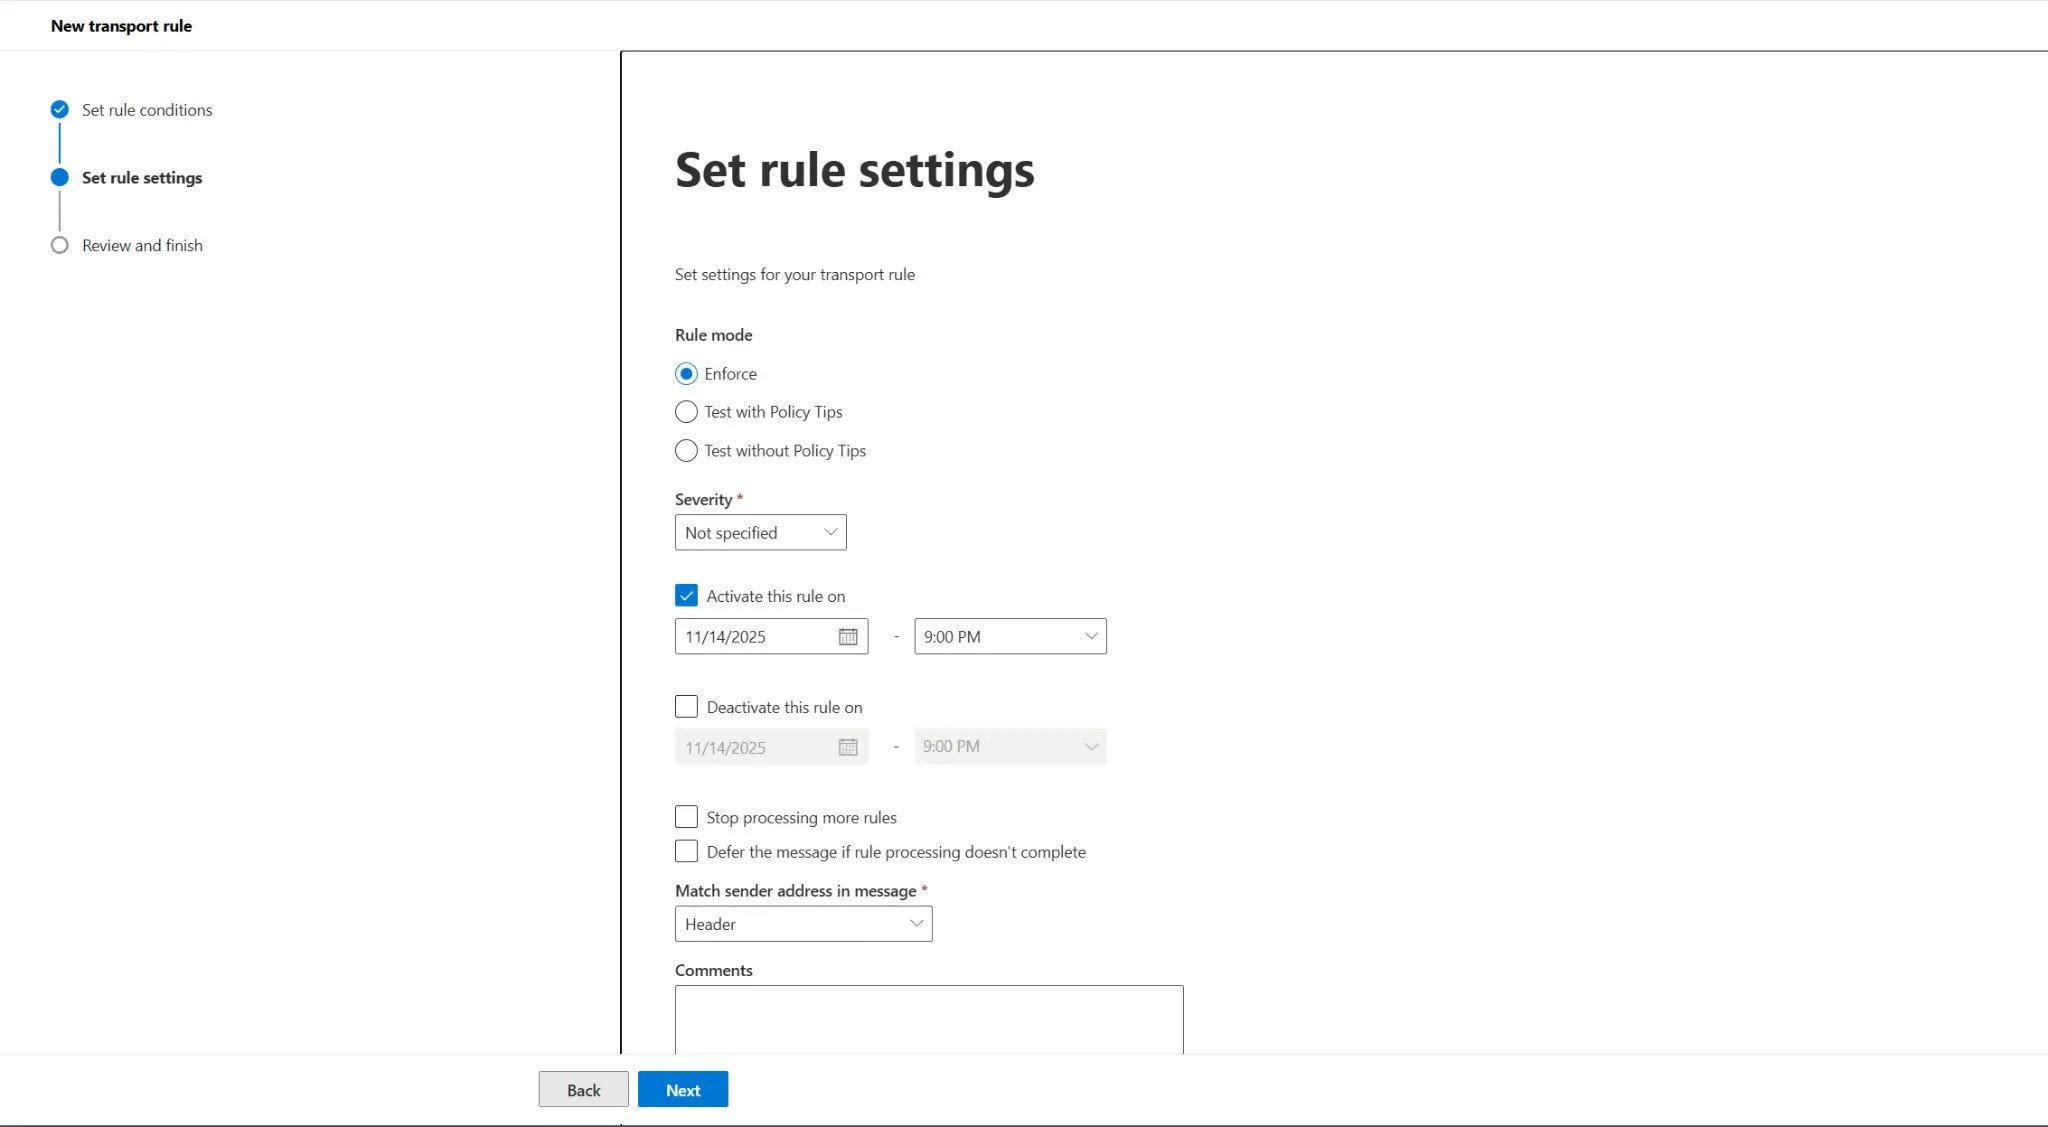
Figure 5: Configuring rule settings including mode, severity, and activation schedule
Click Next to proceed to the final review.
Step 7: Review and Create the Rule
On the Review and finish page, carefully review all the settings you've configured. Verify that the conditions, actions, and settings are correct. If everything looks good, click Finish to create the rule. The rule will be created and will start operating according to the mode you selected.
⚠️ Testing Recommendation: After creating the rule in test mode, send a test email from an external account (such as Gmail or Outlook.com) to a user in your organization. Then check the message trace in the Exchange Admin Center to verify that the rule was triggered. You can find message trace under Mail flow > Message trace.
Method 2: Via PowerShell
For administrators who prefer the command line or need to automate rule deployment across multiple tenants, PowerShell offers a quick and replicable method.
📌 Note: First, ensure you're connected to Exchange Online PowerShell. If you haven't already, install the module and connect to your organization.
Use the following command to create the same external email warning rule:
New-TransportRule -Name "External Email Warning" `
    -FromScope NotInOrganization `
    -ApplyHtmlDisclaimerLocation Prepend `
    -ApplyHtmlDisclaimerText '<p><div style="background-color:#FFEB9C; padding:10px; border:1px solid #FFC82B; font-size:10pt; font-family: ''Calibri'',''Arial'',''sans-serif'';"><strong>[WARNING]</strong> This message was sent from outside the organization. Do not click links or open attachments unless you recognize the sender and know the content is safe.</div></p>' `
    -ApplyHtmlDisclaimerFallbackAction Wrap `
    -Mode Enforce
This command creates and immediately activates the rule (-Mode Enforce). If you prefer to test first, change the mode parameter to -Mode 'TestWithoutPolicyTips'. You can later modify the rule using the Set-TransportRule cmdlet to change it to Enforce mode.
Best Practices
Configuring Mail Flow Rules is powerful, but poor management can lead to unwanted consequences, such as blocking legitimate emails or failing to apply security policies. To avoid these problems, follow these best practices recommended by Microsoft and community experts.
1 Always Test Rules Thoroughly
Before applying a rule to the entire organization, it is essential to test it thoroughly. Exchange Online offers test modes that allow evaluating a rule's impact without affecting email flow. Use Test without Policy Tips mode to analyze reports and confirm the rule is triggered only in intended scenarios. This step prevents business interruptions and ensures the rule's logic is correct. After testing for several days and reviewing message traces, you can confidently switch the rule to Enforce mode.
2 Define Correct Scope
Avoid creating overly broad rules. Instead of applying a rule to "all messages", restrict its scope as much as possible. Use specific conditions to target the rule only to relevant senders, recipients, or message types. For example, if a rule is intended for external emails, make sure the condition "The sender is located outside the organization" is correctly configured. A well-defined scope reduces the risk of false positives and ensures the rule operates efficiently without unnecessary processing overhead.
3 Manage Rule Priority Carefully
Mail Flow Rules are processed in priority order, from lowest to highest number (priority 0 is processed first). Order can be critical, especially when multiple rules may apply to the same message. If you have a rule to block messages and another to add a disclaimer, the blocking rule should have higher priority (lower number). Use the Stop processing more rules option strategically to ensure that once a critical rule is triggered, no other lower priority rule will be applied to that message.
4 Document Rules Comprehensively
As the number of rules increases, their management can become complex. Use the Comments field in each rule to describe its purpose, the reason for its creation, who requested it, and when it was implemented. This simple practice facilitates future maintenance, troubleshooting, and knowledge transfer among IT team members. Good documentation is invaluable when investigating email delivery issues or during compliance audits.
5 Monitor and Review Regularly
An organization's environment is dynamic. Create a process to review existing Mail Flow Rules periodically (for example, every six months). Check usage reports to identify rules that are no longer triggered or may be causing problems. Use the Exchange Admin Center's reporting features to analyze rule hits and effectiveness. Regular review ensures your rules remain relevant, effective, and aligned with current company policies and security requirements.
Common Errors to Avoid
Incorrect configuration of Mail Flow Rules can cause more problems than solutions. Here are the most common mistakes administrators should avoid:
- Creating overly broad rules: A classic mistake that can lead to blocking or manipulating legitimate emails. Always be as specific as possible in your conditions. For example, instead of blocking all emails with attachments, specify the exact file extensions that pose security risks.
- Not testing before activating: Activating a rule in Enforce mode without prior testing can interrupt email flow for the entire organization. A small logic error can have significant business impact. Always use test mode first and monitor message traces for at least a few days before enforcing.
- Forgetting important exceptions: Sometimes a rule needs exceptions to work correctly. For example, a rule that blocks emails from certain domains may need an exception for a specific business partner. Similarly, a rule that requires encryption might need exceptions for automated system notifications that don't support encryption.
- Not documenting the rule's purpose: Six months later, you or another administrator may not remember why a particular rule was created or what business requirement it addresses. Always use the Comments field to document the context.
- Not reviewing old rules: Rules created for temporary projects or specific threats may become obsolete. Regularly audit your rules and disable or delete those that are no longer needed.
Troubleshooting
Even with careful configuration, sometimes rules don't behave as expected. Here are common issues and how to resolve them:
The Rule Isn't Working
If your rule doesn't seem to be triggering, first wait for propagation time. After creating or modifying a rule, it can take up to 30 minutes to be fully applied across all Exchange Online servers. Check if the rule is enabled and if the mode is set to Enforce (not test mode). Confirm the priority - a higher priority rule may be triggered first and using the "Stop processing more rules" action, preventing your rule from being evaluated. Validate the conditions carefully to ensure they match exactly the scenario you want to capture. Use message trace to see which rules were evaluated and applied to specific messages.
Messages Being Blocked Incorrectly
If legitimate messages are being blocked or modified incorrectly, review your conditions and exceptions. This is the classic scenario of an overly broad rule. Use test mode and analyze message trace reports to understand why legitimate emails are being caught by the rule. You may need to add exceptions for specific senders, recipients, or message characteristics. Consider using the "sender domain is" condition instead of "sender is external" if you need more granular control.
Multiple Rules in Conflict
If you have multiple rules that seem to interfere with each other, review the priority order. Reorganize rules to ensure business logic is followed correctly. Use "Stop processing more rules" strategically to prevent unwanted interactions. Remember that all matching rules will be applied unless explicitly stopped, so the order and the stop processing option are crucial for predictable behavior.
Conclusion
Mail Flow Rules are an indispensable tool in any Microsoft 365 administrator's arsenal. Their ability to inspect and act on emails in transit offers a level of granular control that is essential for an organization's security, compliance, and operational efficiency. From simple disclaimer application to building complex data loss prevention policies, the possibilities are vast and the impact on organizational security can be significant.
By following the best practices presented here — testing thoroughly, defining precise scope, managing priorities, documenting comprehensively, and reviewing regularly — you will be building a robust and sustainable rules system. Careful implementation of these rules not only protects your organization against threats but also optimizes workflow and ensures company policies are applied consistently and automatically across all email communications.
We encourage you to start with simple scenarios, such as the external email warning demonstrated in this guide, and gradually explore more advanced features to get the most out of Exchange Online. As you become more comfortable with Mail Flow Rules, you can implement more sophisticated scenarios like automatic encryption for sensitive data, integration with Data Loss Prevention policies, and complex routing rules for compliance requirements.
References
- Microsoft. (2024). Mail flow rules (transport rules) in Exchange Online. Microsoft Learn. https://learn.microsoft.com/en-us/exchange/security-and-compliance/mail-flow-rules/mail-flow-rules
- Microsoft. (2025). Manage mail flow rules in Exchange Online. Microsoft Learn. https://learn.microsoft.com/en-us/exchange/security-and-compliance/mail-flow-rules/manage-mail-flow-rules
- Microsoft. (2024). Feature permissions in Exchange Online. Microsoft Learn. https://learn.microsoft.com/en-us/exchange/permissions-exo/permissions-exo
- Microsoft. (2025). Connect to Exchange Online PowerShell. Microsoft Learn. https://learn.microsoft.com/en-us/powershell/exchange/connect-to-exchange-online-powershell?view=exchange-ps
- Microsoft. (2025). Best practices for configuring mail flow rules in Exchange Online. Microsoft Learn. https://learn.microsoft.com/en-us/exchange/security-and-compliance/mail-flow-rules/configuration-best-practices
- Microsoft. (2025). Test mail flow rules in Exchange Online. Microsoft Learn. https://learn.microsoft.com/en-us/exchange/security-and-compliance/mail-flow-rules/test-mail-flow-rules
- Microsoft. Exchange Team Blog. Microsoft Tech Community. https://techcommunity.microsoft.com/t5/exchange-team-blog/bg-p/Exchange