Most security incidents don't begin with domain admin credentials. They begin with a compromised user who had local admin rights. This comprehensive, step-by-step guide walks you through deploying Microsoft Intune's Endpoint Privilege Management (EPM) to replace the dangerous "Local Admin Everywhere" model with a secure, just-in-time elevation strategy. Includes a phased rollout plan, real-world persona definitions, elevation rule examples, and best practices designed specifically for Small and Medium-sized Businesses.

- Permanent local admin rights are the #1 enabler of lateral movement and ransomware amplification
- Simply removing admin rights without an alternative breaks productivity and creates shadow exceptions
- Deploy Intune EPM in Audit Mode first to understand your elevation landscape
- Define user personas (Standard, Power User, IT Staff, Developer) and assign targeted rules
- Create tight elevation rules using file hash + publisher certificate for maximum security
- Roll out gradually: IT Staff → Power Users → Standard Users → Developers
- Monitor and optimize continuously using EPM's built-in reporting dashboard
The Problem: "Local Admin Everywhere"
Many organizations continue to allow widespread local administrator rights due to legacy applications, installers, scripts, and operational convenience. It is a practice that has persisted for years, often justified by the need to "keep things running." However, this convenience comes at a significant cost to your security posture.
Permanent local admin rights introduce a range of serious security risks. An attacker who compromises a single user account with local admin privileges can leverage that foothold to move laterally across the network, escalate privileges to domain-level access, dump credentials from memory using tools like Mimikatz, and amplify the impact of ransomware attacks. Furthermore, organizations with widespread local admin rights frequently face audit findings and compliance failures, as this configuration directly contradicts the principle of least privilege.
The reality is that most security breaches don't start with a sophisticated zero-day exploit. They start with a standard user account that has far more privilege than it needs. Every endpoint with a local admin account is a potential entry point for an attacker, and in an SMB environment where resources are limited, the consequences of a breach can be devastating.
Many IT teams grant local admin rights as a quick fix for a support ticket, intending to revoke them later. In practice, these temporary grants are rarely tracked and almost never revoked, creating a growing pool of over-privileged accounts that persist indefinitely.
Why Simply Removing Admin Rights Fails
The instinct to solve this problem by simply stripping all local admin rights is understandable, but it almost always fails without a proper elevation strategy in place. Removing admin rights in a blanket fashion, without providing an alternative, creates a cascade of operational problems.
Business-critical applications that require elevated permissions to install or update will break. IT help desk tickets will surge as users are unable to perform routine tasks. User friction increases dramatically, leading to frustration and decreased productivity. Perhaps most dangerously, the pressure to "just make it work" leads to uncontrolled exceptions, where admin rights are quietly granted back to specific users without proper documentation or oversight, creating an even less secure and less auditable environment than before.
The key takeaway is this: removing local admin rights without an elevation strategy breaks productivity. Deploying an elevation strategy without a phased approach breaks adoption. The solution requires a balance between the principle of Least Privilege and operational reality.
The Solution: Intune Endpoint Privilege Management (EPM)
Microsoft Intune Endpoint Privilege Management (EPM) introduces a controlled elevation model that replaces the need for permanent administrator privileges. It is an add-on capability available as part of the Intune Suite and applies to Windows devices.
With EPM, your organization's users can run as standard users by default and complete tasks that require elevated privileges only when necessary, and only for the specific applications you approve. This aligns directly with Zero Trust principles, where trust is never assumed and access is continuously verified.
The key capabilities of EPM include just-in-time elevation for temporary, controlled access; policy-based privilege control that allows administrators to define exactly which applications can be elevated and under what conditions; granular elevation rules based on file hash, certificate, path, or executable name; and comprehensive audit visibility and reporting that provides detailed logs of every elevation event in your environment.
With EPM enabled, users see a new option in the right-click context menu — "Run with elevated access" — which replaces the need for permanent local admin rights:

At a Glance: Local Admin vs. Just-in-Time Elevation
The following table summarizes the fundamental differences between the traditional model of granting local admin rights and the modern approach offered by EPM. Understanding these differences is essential for building the business case for your rollout.
| Aspect | Local Admin by Default | Just-in-Time Elevation (EPM) |
|---|---|---|
| Privilege Duration | Permanent | Temporary |
| Security Risk | High | Reduced |
| Lateral Movement Exposure | Elevated | Controlled |
| Credential Theft Impact | Severe | Limited |
| User Productivity | High (but risky) | High (controlled) |
| Audit & Compliance | Frequent findings | Stronger posture |
| Visibility | Low | Detailed reporting |
Step 1: Audit Mode – Understand Elevation Patterns Before Enforcement
The first and most critical phase of any EPM deployment is to observe and understand the current state of your environment. Before you enforce a single rule, you need to know which applications your users are elevating, how often, and why. Deploying EPM in Audit Mode gives you this visibility without impacting the user experience.
When you deploy an Elevation settings policy with reporting enabled, the EPM client is automatically installed on targeted devices. The client uses the Microsoft EPM Agent Service and stores its binaries in C:\Program Files\Microsoft EPM Agent. From that point forward, it begins collecting data on all elevation attempts, both managed and unmanaged.
How to Configure Audit Mode:
- Navigate to the Microsoft Intune admin center.
- Go to Endpoint security > Endpoint Privilege Management.
- Create a new Elevation settings policy for the Windows 10 and later platform.
- In the configuration settings, enable Endpoint Privilege Management.
- Set the Default elevation response to Deny all requests to ensure no uncontrolled elevations occur.
- Enable Send elevation data for reporting and set it to Yes.
- Assign this policy to a pilot group of users or devices.
Run Audit Mode for a minimum of two to four weeks to capture a representative sample of elevation activity. This data will be the foundation for every decision you make in the subsequent phases. Shorter audit periods risk missing infrequent but critical elevation patterns.
Jumping straight to enforcement without understanding your elevation landscape is the fastest path to user frustration and rollback. Without audit data, you're guessing which applications need elevation rules — and guessing wrong means breaking workflows.
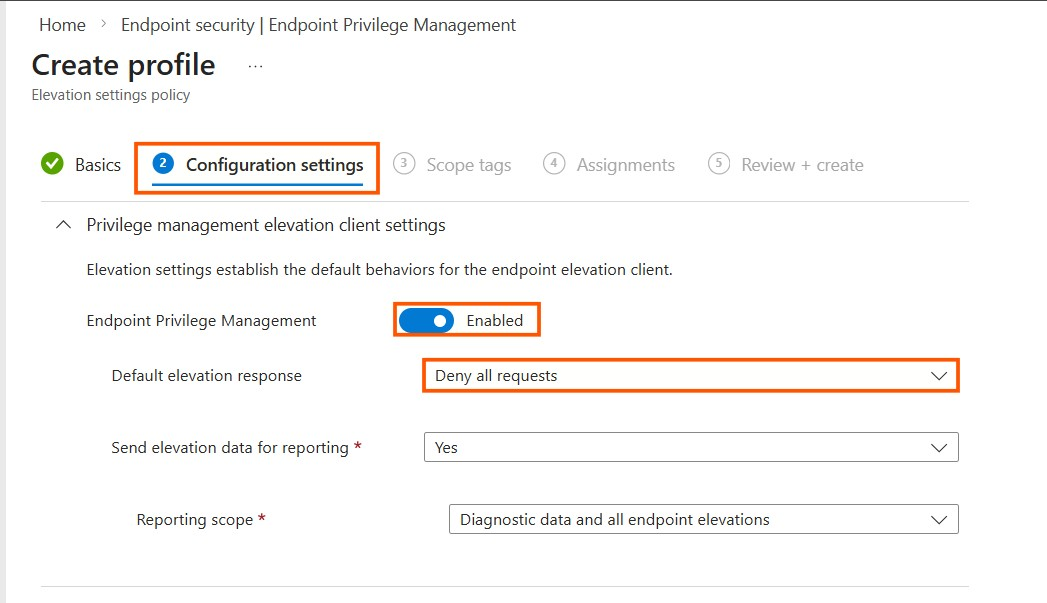
The screenshot below shows the Elevation settings policy configuration page in the Intune admin center. Notice the key settings: EPM is Enabled, the Default elevation response is set to Deny all requests, and elevation data reporting is set to Yes:
Step 2: Define Personas – Segment Users by Role and Need
With the data from your audit phase in hand, the next step is to segment your users into distinct personas. Not all users have the same elevation needs, and a one-size-fits-all policy will either be too restrictive for some or too permissive for others.
Based on the elevation data you collected, you should be able to identify clear patterns. The following table provides a recommended persona framework for most SMB environments.
| Persona | Description | Typical Elevation Needs | Recommended Elevation Type |
|---|---|---|---|
| Standard User | The majority of your workforce (e.g., sales, HR, admin staff) | Minimal to none | Deny by default; specific exceptions only |
| Power User | Users in roles like marketing or finance who occasionally need to install trusted software | Occasional, for specific trusted apps | User Confirmed (with business justification) |
| IT Staff | Help desk, support engineers, and system administrators | Frequent, for a wide range of tools | User Confirmed or Automatic (for trusted IT tools) |
| Developer | Engineers who require frequent access to development tools, SDKs, and system processes | Frequent and varied | User Confirmed or Automatic (with strict hash/cert rules) |
By mapping your users to these personas, you can create targeted Entra ID security groups (e.g., SG-EPM-StandardUsers, SG-EPM-PowerUsers, SG-EPM-ITStaff, SG-EPM-Developers) and assign the appropriate elevation policies to each group.
Use dynamic Entra ID groups based on department or job title attributes to automatically assign users to the correct persona group. This eliminates manual group management and ensures new hires are immediately covered by the right elevation policies.
Applying the same elevation rules to all users inevitably leads to one of two outcomes: the policy is too permissive for standard users (creating unnecessary risk) or too restrictive for power users and developers (creating friction and workarounds). Persona-based segmentation is essential.
Step 3: Create Elevation Rules – The Heart of Your EPM Deployment
With your personas defined and your security groups created, it is time to build the elevation rules that will govern how specific applications are elevated. This is the most granular and powerful aspect of EPM.
EPM uses two types of policies that work together. The Elevation settings policy controls the overall behavior of the EPM client on the device, including the reporting level and the default elevation response. You configured this in Step 1. The Elevation rules policy defines the specific rules for individual applications, including which files can be elevated, under what conditions, and with which elevation type.
Understanding Elevation Types
EPM supports several elevation types, each suited to different scenarios:
- User Confirmed: The user right-clicks the application and selects "Run with elevated access." You can configure this to require a business justification, a Windows authentication prompt, or both. This is the recommended default for most elevation scenarios, as it provides a balance between usability and accountability.
- Automatic: The application elevates automatically without any user interaction. Use this with extreme caution and only for highly trusted, specific applications where the risk is minimal, such as a specific version of a corporate installer signed by a trusted certificate.
- Support Approved: The user must submit a request that must be approved by an administrator before the elevation can proceed. This is ideal for sensitive or infrequent elevation needs where an additional layer of oversight is warranted.
- Elevate as Current User: Runs the elevated process under the signed-in user's own account, preserving compatibility with tools that rely on the active user profile. This should only be used when virtual account elevation causes application failures, as it introduces a broader attack surface.
- Deny: Blocks a specific file from running in an elevated context. Useful for preventing known malicious or unwanted software from being elevated.
How to Create an Elevation Rule:
- In the Endpoint Privilege Management section of the Intune admin center, create a new Elevation rules policy.
- Select the Windows 10 and later platform.
- Add one or more rules. For each rule, specify the file name (e.g.,
installer.exe), the elevation type, and the identification method. - Configure child process controls to govern how subprocesses created by the elevated application are handled.
- Assign the policy to the appropriate security group (persona).
Rule Identification Methods
The following table compares the different methods you can use to identify files in your elevation rules, ordered from most secure to least secure.
| Method | Security Level | Description | Best For |
|---|---|---|---|
| File Hash | Highest | Uniquely identifies a specific version of a file | Critical applications where version control is important |
| Publisher Certificate | High | Trusts applications signed by a specific vendor | Vendor-managed applications that are regularly updated |
| File Path | Lower | Allows any file in a specific directory to be elevated | Controlled directories with strict access controls |
| File Name | Lowest | Matches based on the file name alone | Should be combined with other methods for security |
Always use the most restrictive identification method possible. A rule based on File Hash combined with Publisher Certificate provides the strongest assurance that only the intended application is being elevated. Avoid using File Path or File Name alone, as these can be spoofed by an attacker.
A rule that elevates any file in C:\Downloads\ or any file named setup.exe is an open invitation for abuse. Attackers can place malicious executables in those locations or rename their payloads to match your rules. Always combine multiple identification methods and prefer hash-based rules for critical applications.
The screenshot below shows the Elevation report in the Intune admin center, with the Elevation detail panel open. Notice how you can see the file path, publisher, hash value, and file version for each elevation event — and directly create a rule from the report data:

Step 4: Controlled Enforcement – Pilot First, Then Expand Gradually
With your rules created and assigned to the appropriate persona groups, it is time to begin enforcement. The key principle here is gradual rollout. Do not attempt to deploy EPM to your entire organization at once.
Start with your IT Staff group. These are the users who are most likely to understand the goals of the project and can provide the most valuable feedback. Deploy your elevation rules to this group first and monitor the results closely for one to two weeks.
Expand to Power Users. Once you are confident that the rules are working as expected for IT staff, extend the deployment to your Power Users group. Again, monitor the EPM reports and gather feedback.
Roll out to Standard Users. This is the largest group and the one where the impact will be most visible. By this point, you should have a well-tested set of rules and a clear understanding of any edge cases.
Address Developers last. Developers often have the most complex and varied elevation needs. By deploying to this group last, you benefit from all the lessons learned in the previous phases.
Throughout this process, use the EPM reports in Intune to track elevation events, identify any applications that are being blocked unnecessarily, and refine your rules accordingly. The goal is to achieve a state where users can perform their work without friction while maintaining a strong security posture.
Deploying EPM to all users simultaneously is a recipe for chaos. You will be overwhelmed with support tickets, unable to distinguish between legitimate issues and user resistance, and forced into emergency rollbacks. A phased approach gives you time to learn, adjust, and build confidence at each stage.
The Elevation report provides a comprehensive view of all elevation activity in your environment. You can filter by date, search for specific files, and see the user, device, file path, publisher, elevation type, and result for each event:

Step 5: Monitoring and Optimization – An Ongoing Process
Deploying EPM is not a one-time project. It is a continuous cycle of monitoring, analysis, and optimization. Your environment will change over time as new applications are introduced, user roles evolve, and new security threats emerge.
EPM provides two categories of reports to support this ongoing effort. Unmanaged elevations capture all file elevations that happen without EPM involvement, such as when a user with administrative rights uses the Windows default "Run as administrator" action. These reports help you identify users or devices that still have unnecessary admin rights. Managed elevations capture every elevation that EPM facilitates, including those triggered by elevation rules and those that occur as part of the default elevation response. These reports provide detailed metadata about each event, including the user, device, application, and elevation type.
Regularly review these reports to track which rules are being used most frequently, identify anomalies or unexpected elevation patterns that could indicate a security risk, discover new applications that may need elevation rules, and verify that your persona definitions and group assignments remain accurate.
Schedule a monthly review of your EPM reports and policies. Use this review to clean up unused rules, tighten identification methods where possible, and ensure that your deployment continues to align with your organization's security goals. Consider creating a shared dashboard or recurring report for stakeholders.
For deeper analysis, click on any elevation event to open the Elevation detail panel. This shows the complete file information including the hash value, certificate payload, file version, and the applicable rule. You can also create a new rule directly from this data, which significantly speeds up the process of building your elevation rule library:
Supported File Types
It is important to note that EPM supports elevating the following file types. When creating your elevation rules, ensure that the target files fall within these supported categories:
- Executable files with a
.exeextension. - Windows installer files with a
.msiextension. - PowerShell scripts with a
.ps1extension.
Conclusion: Balance Least Privilege with Operational Reality
Removing local administrator rights is one of the most impactful security measures an organization can take. However, it must be done thoughtfully and strategically. Removing admin rights without an elevation strategy breaks productivity. Deploying EPM without a phased approach breaks adoption.
By following the five-phase rollout strategy outlined in this guide — from Audit Mode through to continuous Monitoring and Optimization — you can successfully transition your organization to a model of least privilege that balances robust security with the operational realities of your business. The result is a more secure, more auditable, and more resilient endpoint environment.
Microsoft Intune Endpoint Privilege Management provides the tools to make this transition possible, empowering any SMB to implement enterprise-grade privilege management without the complexity of traditional PAM solutions. The key is to start with the fundamentals, build incrementally, and continuously refine your approach based on your organization's evolving needs.